Kill zone is kill zone, right? Right. Except when it’s . . . not. When a hunter says “kill zone,” he almost always means that area on any given animal that a shot will prove lethal – oftentimes dropping the quarry in its tracks (that’s our jobs as hunters, right?). But if you’re a member of the One Shot Nation, a.k.a., a TrackingPoint customer, “kill zone” has an alternative, yet parallel, meaning. With a TrackingPoint networked tracking scope, users can adjust how close they want that bullet to land in relation to the tag he or she set. Do you want the shot tight, or loose? When is either useful? The answer, almost always, is that it depends on what you’re shooting.
With that, let’s get into the details of how and when to use this feature of the networked tracking scope system.
Small or Large KZ Setting?
The kill zone feature enables the shooter to adjust the area in which you have to be precisely back on the tag in order for the trigger solenoid to release. The shot therefore is released at the closest point to center of the tag during reticle and tag alignment.
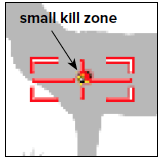
Small Kill Zone Setting
Small KZ Example – The image shows a small kill zone set as the armed firing solution’s path intersects the tag. A smaller kill zone can result in a more precise shot but may take longer to align the firing solution with the tag, resulting in a slower time to fire the shot. A small kill zone setting may make sense for a longer distance shot or even for smaller game. Or smaller game at a further distance.

Large kill zone setting
Large KZ Example – The image shows a large kill zone set as the armed firing solution’s path intersects the tag. A larger kill zone can still result in a precise shot depending on how close the shooter aligns with the center of the tag. If the shooter aligns anywhere within the kill zone the system will fire.
A larger kill zone will allow for faster alignment of the firing solution with the tag, resulting in faster time to fire the shot.
Contrary to what logic may tell you, a larger kill zone setting does not necessarily cause a more inaccurate shot. That’s because the TrackingPoint scope uses a “Closest Approach” algorithm. If you are aligned perfectly or moving toward perfect alignment, the trigger weight remains inflated until you reach the closest point to the center of the kill zone.
The KZ setting is always displayed at the top center of the head’s up display (HUD).
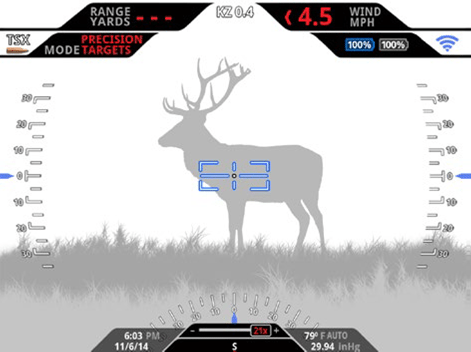
Your KZ setting is shown at the top of the HUD in the middle between range and wind.
When to change KZ setting
The size of the kill zone affects the precision and time it takes to make a tagged shot as described in the previous examples. General guidelines are below, however, the skill of the shooter will also affect ability to quickly make tagged shots at various kill zone sizes. The system’s kill zone can be set from 0.1 MOA up to 4.0 MOA, and recommended settings vary with different modes of the TrackingPoint scope. When your rifle arrives at its new home, the kill zone will be set at .2 MOA and they are zeroed at .1 MOA.
For Advanced Targets mode, a 0.2 MOA kill zone size is recommended because you’re shooting static targets, and it allows more time to align the firing solution with the tag. A 0.5 MOA kill zone size is recommended for shooting moving targets when using the Advanced Movers mode, making it easier to get a shot off while slewing the gun to the target as it moves. Additionally, to keep the grouping tight or to ensure a more precise point of impact at long-range target shooting, it’s recommended to decrease the kill zone setting to .1 MOA.
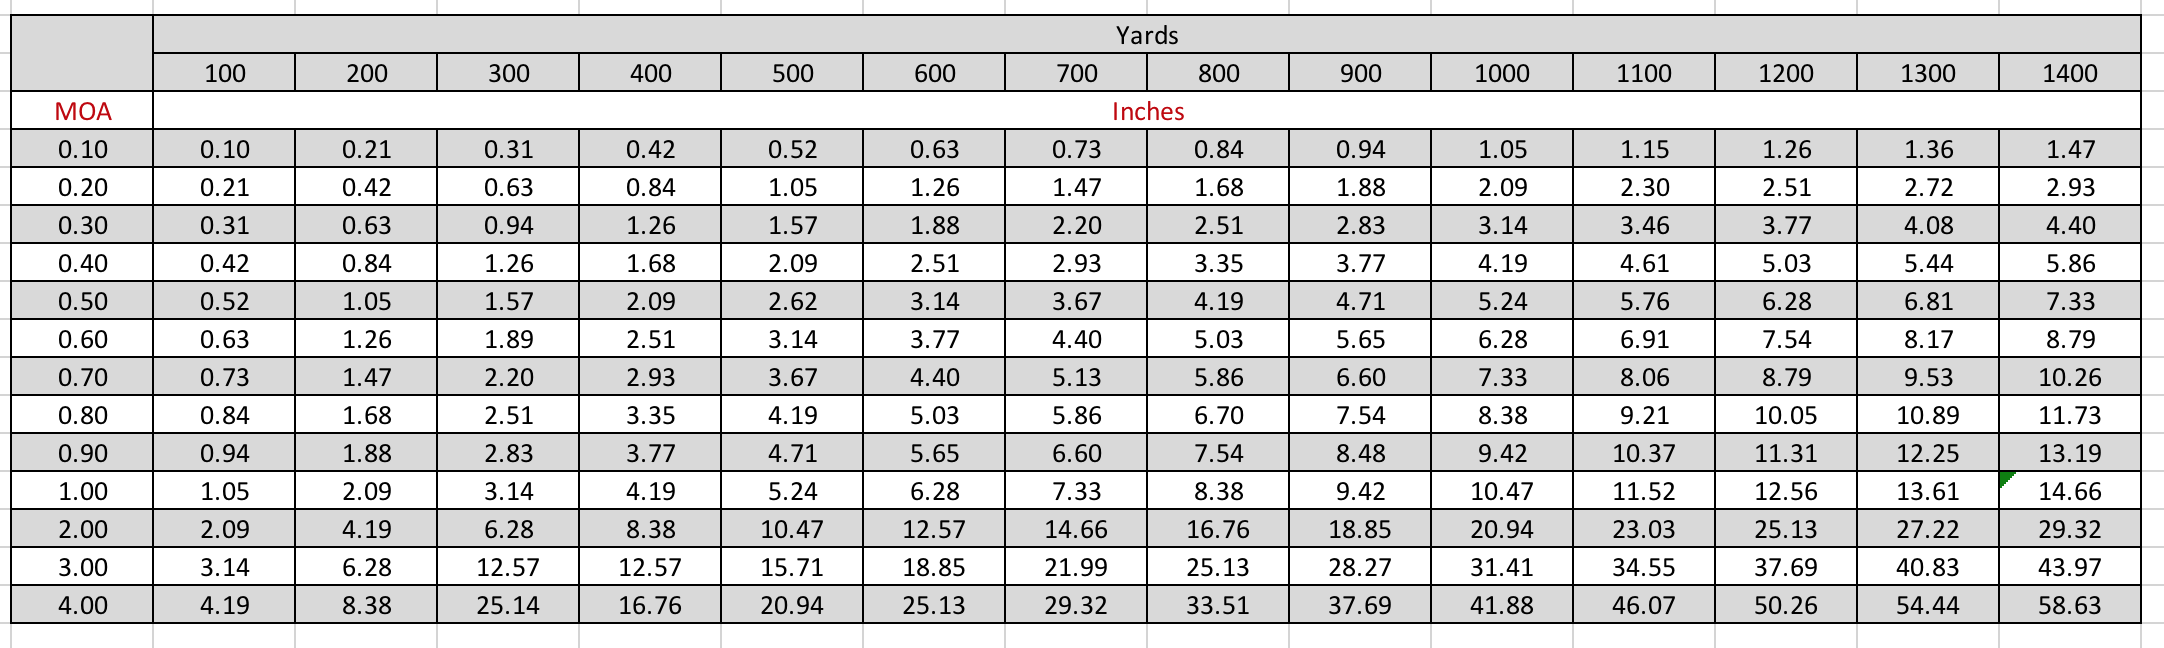
MOA to Inches
The following chart shows the conversion of MOA to Inches at various ranges. The rule of thumb is that 1 MOA is about 1” for every 100 yards. Therefore:
1 MOA equals approximately 1 Inch at 100 yards
1 MOA equals approximately 5 Inches at 500 yards
Two Ways to Set KZ
The kill zone feature can be set in one of two ways. The first way is to set the kill zone in the HUD. Simply press the mode button down for 3 seconds. Once it’s set, tap the mode button again to save and exit.
The second way to set the kill zone setting is via the TrackingPoint App, available on both Apple iTunes and Google Play. The TP App allows users to manage media and configure the networked tracking scope. Download and open the App, and tap the button labeled “Settings.” Inside Settings you’ll see an option to change Impact or Kill Zone. This will automatically update your networked tracking scope with the new kill zone settings.
We hope you have a better understanding of this particular feature of the TrackingPoint system. If you have any questions regarding this or any other feature, you may call Support at 512-222-0501 or email support@tracking-point.com and one of our reps will be glad to work with you.